


Spent time over this weekend working on the second attempt for these tiles. They seem to have turned out OK, we'll see if they can be implemented into Fire With Fire smoothly though. Fingers crossed!
In the meantime, I thought I'd share a little bit about making seamless tiles using Adobe Illustrator. I used CS4 if you're curious, but I don't think the version will matter that much. This is pretty basic stuff we'll be using.
A lot of tilesets you see in older games like Fire Emblem or the Legend of Zelda are done in a pixel art style--no anti-aliasing.

I actually think such a precise method of working at a small scale makes it a little easier (a little) to make seamless tiles, since there's less room for error. The more pixels you work with, the more likely you may be to run into trouble lining things up perfectly.
But what do we do if we want tilesets with bigger anti-aliased shapes and patterns? Let's take a look. Fire up Illustrator.
First things first. Decide how big you want your tiles to be. In this example, I'll make the tiles 200 x 200 pixels for clarity's sake. So let's make a new canvas in Illustrator with those dimensions.

Now we're all set up with a canvas. But a blank slate won't do us much good, so let's start making a pattern for our tiles. Plop any old shape down--just make sure that it crosses one of the borders of the canvas. This border is the "seam" that we'll be looking at in order to get repeating patterns to line up perfectly.

Alright. Now when we make tiles out of this canvas, what we want is for the right side to line up perfectly with the left so that it appears continuous horizontally. Right now, the right half of the tile is taken care of, but how do we get a perfect match on the other side?
Make a copy of the shape you chose.

Now we're going to work on moving the copy to the correct position for seamlessness. Is that a word?
Select both shapes at once. You can left click and drag a box around them both, or left click one then Shift click the other. Just make sure both are highlighted as shown below.

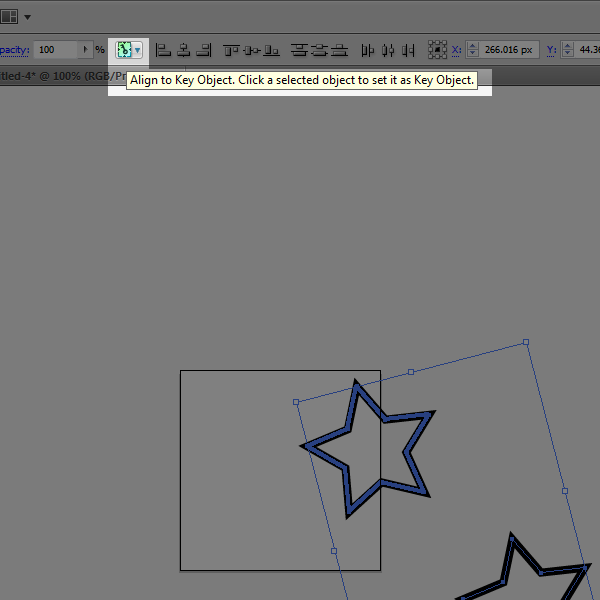
This part might be a little tricky, so bear with me. Now that both shapes are selected, left click once more on the shape sitting on the canvas border. If done correctly, that shape should have a slightly bolder highlight than the other.

What you've done is made the border shape a Key Object for alignment. This is important for getting the exact positions we'll need for both shapes to 'connect' to one another once we've made tiles out of this.
Basically, it tells Illustrator how to align shapes when you use Alignment options. You can also align things to the Artboard (or canvas, same thing) or to a Selection (group of shapes). But with Align to Key Object, all other shapes will be aligned based on where that Key is.
So the next step is to start using these Alignment Options. They should be at the top of your screen.
But if not, you can show them by going to Window > Align on the top options bar. You'll see a window with different actions like 'Horizontal Align Left' and so forth.
Make sure both shapes are still highlighted, with the one sitting on the border made as the Key Object (slightly bolder highlight). Let's select Vertical Align Center from the Align options. The shape on the edge of the canvas is our Key Object, so that won't move. The copied shape should move so that it lines up with the Key. Demonstrated below.

Now let's do Horizontal Align Center. Again, the Key Object won't go anywhere. At this point, the 2nd shape should be in the exact same position as the Key.

Alright, now both shapes are sitting in the same spot. Click outside of the bounding box to deselect both of them. Click on the overlapping shapes once more--by default, Illustrator will only select the one sitting on top. So you should only have one of the two shapes highlighted (though you can't really tell by looking at them. If you want to be absolutely sure, you can always check the Layers window to see what shapes are selected. There should be a colored indicator next to any object you've selected--in this case, only one of the two should be.)
Now we're going to move this top shape again. At the top options bar, go to Object > Transform > Move.

A new window should appear with options for moving stuff around.

What we do at this point is move the shape the same distance as the canvas size. Our tiles in this example are 200 pixels wide, so naturally we're going to move this shape left 200 pixels. So, as shown, insert -200 into the horizontal Position, and the shape will sit on the opposite border of the first one.
The fundamental rule applies whether the tiling is seamless horizontally or vertically. If you had begun with a shape on the bottom edge, you'd align them so that they're overlapping just like before--but shift one to the top edge by using Move > +200 Vertical position.
Anyhow, it might be hard to tell, but now we have a tile that is seamless across its left and right edges. Let's go to File > Save for Web and Devices and save this thing to create a 200 x 200 tile.
Illustrator only exports what's inside the canvas border, so the lightened area is what will be saved in the exported file.

Save it. Now we have a 200 x 200 tile.

If you put several of them side by side, they should line up such that it's impossible to tell where one ends and the next begins. We should see the entire shape come together at the seams (borders).

A simple linework star is all well and good, but let's try something a little more complex. Another tile with shapes overlapping the vertical as well as the horizontal borders:

And the seamless tiling.

That's basically it. No matter what pattern you plan to use, or what direction the seamlessness needs to be in (horizontal, vertical, or both), I'd recommend planning out what shapes will sit on the border first. You can get as simple or as complicated as you want with complex gradients or irregular shapes. The important thing is to copy whatever shapes sit on a border, line them up, and move them the correct distance to the opposite side.
The nice thing about doing all of this in Illustrator is that you can scale up tiles as much as you want even using anti-aliased shapes. I don't know if grass tiles really need to be that huge for any reason; but at least the possibility is there, especially in an age where screen displays, mobile or otherwise, are packing more pixels than ever.
Hey Brian check this site out http://dribbble.com/
ReplyDeleteThank you. I visit Dribbble at least once a day now. In fact, I think you were the one who introduced me to it last year haha.
DeleteHey Brian Doing great let's talk next week
Delete